Prologue: The Atomic 4 Quits because of Dirty Fuel
In Decmber 2002, we went out to rendezvous with some friends at Angel Island for lunch. When we set out, there was plenty of wind, and we were sailing in some pretty rough water, getting tossed about on 4 foot square chop, which is pretty common on windy San Francisco Bay.
Then the wind started to die, just when we were about to enter the shipping lanes, and just when the ebb tide out the Gold Gate was reaching its max of about 4 knots Before we entered the shipping lanes, we fired up the Atomic 4 engine, our usual custom when we thought we might need it for safety. It started right up, purring as usual.
We had been motoring for about 30 minutes, when the perfectly purring, beautifully rebuilt Atomic 4 just quit on us. Unfortunately, we were right in the middle of the shipping lanes, about 4 nm from the Golden Gate Bridge, on a 4 knot ebbing current.
It was pretty clear we had a fuel problem. The starter was working fine. We had spark. So I removed the Raycor fuel filter to inspect inside. There was no water. But it was clogged with what appeared to be dark red-brown sand, and white crystals that looked like irregular grains of salt. The gas inside the filter itself looked clear, and it wasn't cloudy, but there was a lot of "sand" and "salts".
We have less than 30 hours on the fuel filter since it was installed, and less than 50 hours on the engine since the complete rebuild.
For the interim, we've fitted a 6 gallon tank in the lazarette, properly secured down and with proper ventilaton in the lazarette, with chafe protection for the hoses, etc. Except for the extra weight in the stern, it's an easy solution to the problem of a main fuel tank gone bad.
What you don't know can hurt you...
If there's crud in your fuel filters, it's time to visually inspect your old aluminum gas tank, not just "polish" the fuel.
Here's another "must do" when you buy a 25 year old Catalina
-- or any boat with a 25 year old aluminum gas tank. Drain the tank and
inspect it visually. What you don't know CAN hurt you.
Sorry to be a messenger bearing bad news.... Please don't shoot the messenger.
:^)
Yesterday, I had the fuel polishers out to drain and clean Bijou's gas
tank. The bottom was covered in what appeared to be grains of blackish-brownish-red
sand, and gray and white gravel up to 1/4" in length. The technician
thought the "sand" was ferrous oxide -- and to prove his point,
he rubbed some into the palm of his hand and it crumbled into a fine dust.
He thought the white and light-brown sharp edged rocks and pebbles and
crystals were aluminum oxide, which he remarked was as almost as hard
as diamonds -- and that they use it to make sand paper.
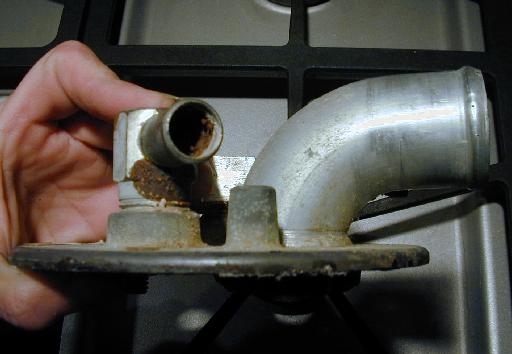
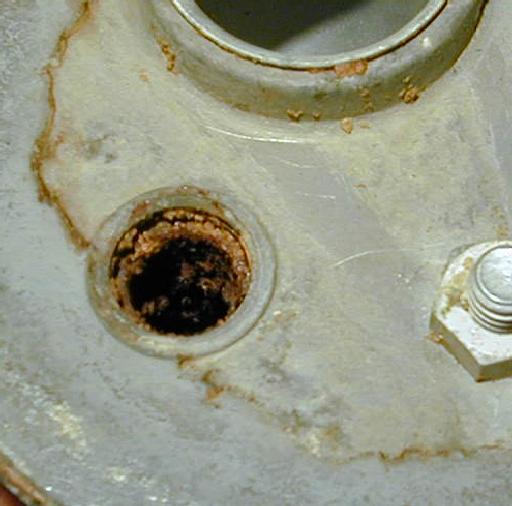
The brown/black/red sand (ferrous oxide?) appears to be from the fittings
on the intake, vent, and output plate. One fitting, the vent fitting I
think, isn't brass or aluminum -- it's completely filled up with deposits
of the dark stuff. They're so corroded one the inside that there's hardly
any metal left... but you wouldn't know it to look at them from the outside.
After cleaning the sand and pebbles out and scraping with a paint scraper
to remove some of the hard white crystals that were stuck to the bottom,
we took mirrors and inspected the tank. In the center, on the bottom,
there were numerous pits in the aluminum about 0.5-0.75 millimeters deep.
They're little less than 1/2 as thick as a penny (which is 1.43 mm thick),
so the pits are at least 0.5 mm deep.
I wonder how much of the tank wall is still left? I didn't have my calipers
with me to measure the wall thickness, so I don't know. All I know is
that there's SIGNIFICANT loss of the wall thickness in a zillion places,
and all it takes is ONE pinhole in the tank to blow up the boat.....
SO.... The bad news is, Bijou's tank is shot. The good news is, we inspected
it before it turned into a strainer, spilling 18 gallons of gasoline into
the bilge. The bad news is that it's gonna be a messy job cutting the
tank up into pieces to remove it. I'm not gonna cut the fiberglass around
it. The other good news is that I'm going to install a much smaller tank,
maybe 8-9 gallons, that'll fit in without cutting the fiberglass and that
I can keep filled and use up in less than a month. But first I have to
remove the old tank.
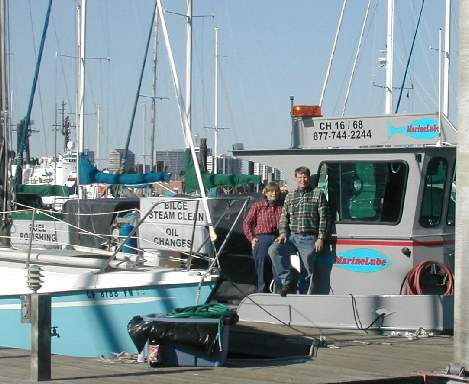
After searching for a month, I finally found somebody to clean my gas tank. I found their ad in Latitude38 magazine.
Meet Nathan & Debra Johnson, a brother and sister team who operate MarineLube in Alameda, CA.
They've got a brand new service boat, with all the latest gear. Nathan is very well trained, knows his chemistry and mechanics, and, bless his heart, treated my boat like his own baby, spreading blankets and absorbent mats to protect it. He was very thorough, even dumping out the fuel lines.
MarineLube is certified for environmental spill containment, and they employ nifty modern-miracle techniques like petroleum-eating bacteria. Debra's primary focus in the business is the ecological dimension of controlling and mitigating damage from gas spills.
They're both nice folks, I enjoyed meeting them and had a lot of confidence in their professional training.
The most expensive part of the service was disposing of the gas. It was $9/gallon. The labor and materail costs for pumpout, dissassembly, cleaning (including a pile of absorbant pads) and spraying job (with some petro-eating bacteria to get rid of all fumes) cost about $100, a very reasonable price, in my opinion, for performing a dangerous job and providing expert evealuation and advice on the condition of the fuel tank.
In the future, I will plan on having Marine Lube perform an annual polish of my fuel, to keep the tank clean. They remove the gas, clean the tank by pumping diesel fuel through it, then remove the diesel fuel, leaving a clean tank.
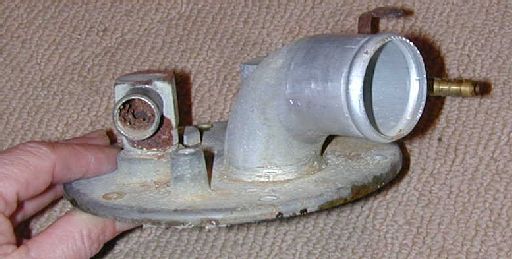
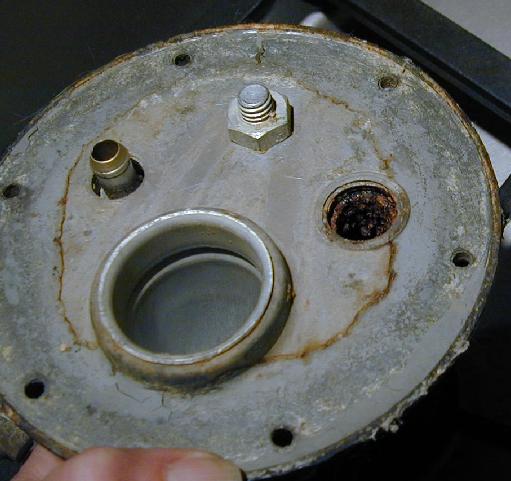
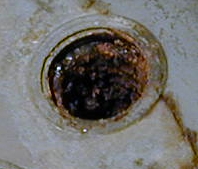
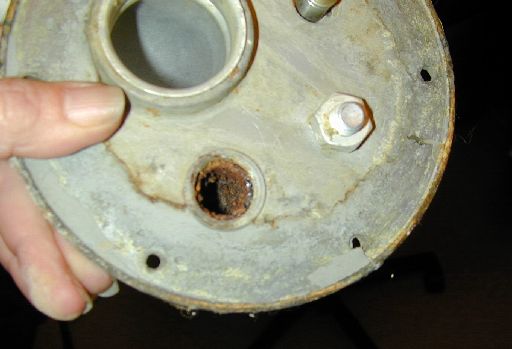
One of the first things Nathan pointed out to me was the corrosion on the filler-fittings plate. When he removed it, we found a great deal of red/brown corrosion in two of the fittings installed on the plate.
This plate was mounted with screws and a gasket on the top of the tank. It has fittings for the fuel fill, vent line, and gas line to the engine.
Nathan removed it to inspect the inside of the tank and to gain access to insert the hose to pump out the tank directly, rather than through the gas-fill line.
He also removed the plate for the gas gauge float, so we could see in both ends of the tank.
The inside of the tank was not baffled. It was full of crud. Off-white crystals and brown sand covered the bottom.

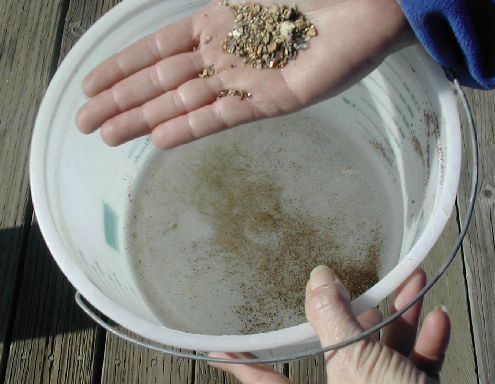
You can see some red/brown sand in the bottom of the bucket. It's the "red-brown sand" that clogged the fuel filter. It's some sort of ferrous oxide, according to Nathan of MarineLube. It's probably from the fittings in the plate on the tank, that's my guess. Th amount you see in the bucket is from just from fuel taken from the gasoline hose... the whole bottom of the tank was covered in "sand" when we removed the plate to inspect the tank.
If you take some of the red stuff and rub it in your hand, it turns into a fine power without much work. You can't crush the tan crystals in your hand. They're hard as rocks, and some have very sharp edges, like gravel.

A view of the inside of the tank,right under the fittings plate. You can see some aluminum oxide crystals and some pitting and larger pockmarks.
This section of the tank was in better shape than other sections, but this was all we could get at with the camera.
The worst corrosion was in the middle of the tank, halfway between the fitting plate and the gas gauge.
I'd estimate that several of the pits I could see or feel were about 1/3 as thick as a penny, or about 0.5 mm deep.
The picture doesn't show the depth of the pock marks and pitting very well. The best way to gauge it was to run my finger nail over it to feel the depth.